Monday, May 31, 2010

Pumpernickel


I admit it, I've been on a extra bit of a bread kick recently. It's just that if you buy only one loaf of store-bought, pre-sliced bread per week, and you and your 'Chefski use it all up on Sunday making that week's lunch for two, a bread-lover like me can get a little antsy. After attacking the fruit stash or making a smoothie, I'm still left craving bread as a snack. At least that's one explanation for my baking-fixation.

When I told my mother that I'd baked yet another loaf of bread the other day, she reasoned that it's probably because in many ways I take after my father, and as she is often quick to remind me, those on his side of the family are in constant need of creating something with their hands. My father used to take apart and build things all the time, and all of his siblings have some kind of hands-on hobby or job, be it repairing old cars, doing people's hair, or drawing and painting. I guess my contribution to the family tradition is making food for fun and not just for feeding.

I chose to tackle my first pumpernickel because I wanted to use some of the rye flour I'd gotten a while back, and I'm pretty happy with the results (check out the cool dots that accidentally formed in the process). In the future I think I'll try a sourdough version and maybe throw in some caraway seeds for a more typical American pumpernickel taste. 

I love the dotted crust.
(See step 5 for how it got this way)

Pumpernickel Bread
Adapted from Smitten Kitchen 

Ingredients
1 cup warm tap water
2 1/2 teaspoons active dry yeast
2 cups unbleached, all purpose flour
1/2 cup whole wheat flour
1/2 cup whole grain rye flour
1 Tablespoon non-alkalized cocoa powder
2 teaspoons salt
1 Tablespoon unsulfured molasses 
cornmeal for sprinkling bottom of loaf 
heavy baking pan

Directions 
1. In a medium bowl, whisk together water and yeast, and let sit for 5 minutes to activate.
2. Add molasses, and all purpose, whole wheat, and rye flours, as well as the cocoa and salt. Stir well to incorporate all the ingredients.
3. Once well-mixed, knead by hand for a few minutes to form an elastic and smooth dough.
4. Place dough in a well-oiled bowl and cover with plastic wrap. Let dough rise at room temperature until doubled.
5. Turn out dough onto a lightly floured surface and form into a round loaf by shaping into a sphere and tucking the dough under until you've created a smooth loaf. Here's how I got those cool dots: if you've got a special baking basket, invert your dough onto a heavily-floured napkin placed inside said basket. If you're like me and don't have one, just place a sheet of Bounty in a bowl, heavily flour it, and invert your dough into the bowl. Cover with plastic wrap and allow to rise until doubled. The dough rises into the basket (or bounty) and takes on the indentations of whatever's under it.
6. When your dough is almost done rising, preheat your oven to 500 degrees F. Be sure your rack is in the middle of the oven.
7. Sprinkle some cornmeal on a baking pan (since I have no baking stone), invert your loaf onto the pan, and score the top of your loaf using a sharp knife (I made an "X" shape, but some bread bakers get really creative with this step and make some great patterns). Feel free to sprinkle some cornmeal on top for good measure. Place in oven.
8. Lower your oven's temperature to 450 degrees F and bake for 40 minutes. I know my dough was particularly dense on the day I made it, so check for doneness/ add a few minutes if necessary so that you don't have raw bread.
9. Remove from oven and place on a wrack to cool. As soon as it was no longer steaming hot (but still warm), I enjoyed it quite thoroughly with a little butter.

Sunday, May 30, 2010

Wild Yeast Sourdough Starter

Technically, this baby's still called "seed culture"

In between lazing about and watching Law and Order: SVU (oh, and CSI too) I've been running a very important experiment involving the cultivation of wild yeast and lactobacilli.

No, I'm not helping 'Chefski with his labwork -- I'm making sourdough bread. Here are some fun facts related to my project:

Did you know that in order to make sourdough bread, you must begin with a sourdough "starter" which can be either procured from a friend, or made by mixing together flour and water (or in my case, unsweetened pineapple juice) and letting it ferment for a few days? During this time, wild yeast basically hop into whatever container you're using and have a fun time producing gas and interacting with bacteria that can be used to make bread. This process takes days, and involves stirring, adding water and flour, and basically babysitting your culture to make sure it stays alive. Some starter recipes call for active dry yeast, just because it isn't always so easy to catch wild yeast in today's über-clean kitchens. In either case, there's more waiting than actual physical labor.

Once you have a starter you use a part of it to make bread and save the rest ("feeding" it flour and water on a regular schedule, indefinitely) to make a variety of baked goods with. This I have done, and now onto the process of making the bread itself. This will take another 18-24 hours (mostly of waiting) before I can produce a loaf. I'm following a recipe for "Berkeley Sourdough," and I'll post about my results in a few days.

Speaking of Northern California, did you know that San Francisco is famous for sourdough and that the region's bread contains it's very own unique bacteria called Lactobacillus sanfranciscensis? Or that the illustrious Boudin Bakery, located at Fisherman's Wharf, has been making their sourdough using the SAME STARTER since 1849? Indeed, during the California Gold Rush, when packaged yeast was hard to come by and also unreliable as a leavening agent, people carried starters in pouches around their necks in order to make bread at their final destinations.

While I'd originally decided to try this bread because it seemed like a crucial step in developing as a bread-baker, learning about its ties to Northern California (where a very dear friend played host and tour guide a few months ago) added an extra layer to my desire to try and make my own. As a tribute to San Francisco, Berkeley, and the history of bread itself, here's to science in the kitchen.

... and now back to tending my cultures...

Your Very Own Sourdough Starter 
Adapted from The New York Times which is adapted from “Artisan Breads Every Day,” by Peter Reinhart (Ten Speed Press, 2009)   

Ingredients
16 ounces flour (which I converted to roughly 3.75 cups)
3 ounces unsweetened pineapple juice
10 ounces filtered water 

Directions
Day 1: Make seed culture. In a large glass jar or nonreactive* bowl, combine 1 ounce of flour (approx. 1/4 cup) with 2 ounces unsweetened pineapple juice. Cover tightly with plastic wrap and leave at room temperature. Be sure to stir with a wet spoon twice day.
Day 2: Between 24 and 36 hours later, bubbles should appear. Fact.
Day 3: After 48 hours (that'd be today!), add another ounce (i.e. 1/4 cup) flour and the last ounce of pineapple juice and stir. Cover with plastic wrap and leave at room temp, again, stirring twice a day with a wet spoon. 
Between Day 4 and Day 7: Between today and Day 7 (i.e. 1-4 days later) your seed culture will become foamy. When it does, in a medium nonreactive bowl, combine 2 ounces flour (1/2 cup) and 1 ounce filtered water. Add seed culture and stir to combine well. Cover with plastic wrap, leave at room temp, and stir twice a day with a wet spoon.
1-2 Days Later: By now your mix will have doubled. That means you're ready to covert it into a starter! Wooo hooo!
Making your starter
1. Combine 12 ounces flour (~2.75 cups) and 9 ounces filtered water in a nonreactive bowl. Add 4 ounces (~1/2 cup) of seed culture mix and discard the rest (or make a second starter) and mix until fully combined.
2. Turn out onto a lightly floured surface and knead for 2 minutes -- it should feel like a bread dough. Transfer to a nonreactive bowl and leave at room temperature until it doubles, about 4-8 hours. 
3. Knead lightly, then store in a container with a tight-fitting lid. It's gotta be big enough to allow for the starter to triple in bulk. Store in the fridge and then...

To be continued...

[Important note: Starters need to be "fed" every 5-10 days. To do so, follow the directions under "making your starter," substituting starter for seed culture.]

* nonreactive means that the material won't absorb odors or flavors and won't transfer them to your food, or deteriorate when it comes into contact with acids in foods. These usually include glass and stainless steel ... avoid plastic, unless it's food grade (ex: Gladware, has a #5 on the bottom).

Thursday, May 27, 2010

Oatmeal Buttermilk Bread


An oldie, but a goodie. I baked some of this a while back but I forgot to post about it, though that doesn't mean it's not worth sharing! I made a pretty small loaf the last time, and the slight sweetness made it a great carby-snack. Next time I'll see how sandwich-appropriate it is.

Oatmeal Buttermilk Bread
Adapted from Annie's Eats

Ingredients
1 1/2 cup rolled oats
1 cup boiling water
1/4 cup room temperature water
2 Tablespoons + 1 teaspoon honey, divided
2 teaspoons dry active yeast
1 1/2 cups buttermilk, room temp
1/2 cup extra virgin olive oil
2 1/2 cups whole wheat flour
2 1/2 cups all purpose flour
2 teaspoons salt

Directions
1. Place 1 1/4 cup rolled oats in medium bowl and mix in the boiling water. Let it sit uncovered for 10 minutes, stirring occasionally.
2. In a cup, combine yeast and the room temperature water. Let the yeast activate while you wait for the oats to finish soaking.
3. After 10 minutes have elapsed, in a larger bowl combine soaked oats, yeasty water, 2 Tablespoons honey, buttermilk, olive oil, 2 cups whole wheat four, and 2 cups all purpose flour. Mix together thoroughly, then add the remaining half cup of each flour.
4. Turn out the dough onto a lightly floured surface, and knead until smooth. If your dough is getting too dry, add a little water -- you want it to be satiny smooth. 
5. Place the dough in a lightly oiled bowl and cover with plastic wrap. Allow to double in size, about an hour or so, in a warm place.
6. Once doubled, turn out onto your lightly floured surface and gently flatten with your hands to release air bubbles. Form into an 8x 6-inch rectangle and form the loaf following the roll down and pinch method used to make the light wheat bread (basically for each roll, starting at the 6 inch side, push down to make sure it seals).
7. Place in your greased loaf pan, and make sure it reaches the edges. Combine remaining teaspoon of honey with 1/2 teaspoon of very hot water, and brush this over the top of the loaf. 
8. Sprinkle some oats on top and let rise for about 30 minutes, or until the loaf rises over the top of the pan. 
9. Preheat oven to 375 degrees F. Bake your bread for 1 hour. Once baked, transfer to a wire rack and allow to cool before slicing.

BBQ Sauce

Fact: This jar once contained molasses.

What to eat? What to eat? While yesterday I wasn't quite in the mood for ribs again, I did want some barbecue sauce, and since we didn't have any lying around, I decided it was high time to make it myself! It's straightforward, you can make it as hot as you like, and it's one of those things you can let go on the stove for a few hours while you park yourself in front of the TV to watch "Law and Order" for the fourth day in a row and still feel productive. 

Hey, it's been a long semester! Don't hate ;)

BBQ Sauce
Adapted from Annie's Eats

Ingredients
1-2 Tablespoons canola oil
1 onion, chopped
3 cloves of garlic, minced
1 teaspoon salt
1 teaspoon chili powder  (though I def added more)
1/4 teaspoon ground cumin
1 Tablespoon honey
3 Tablespoons unsulfured molasses
3 Tablespoons dark brown sugar
28 0z can of whole peeled tomatoes
1/4 cup cider or sherry vinegar (because I only had sherry!)
2 Tablespoons white vinegar
1 Tablespoon Worcestershire sauce
2 teaspoons black pepper
1/2 cup water 

Directions
1 . In a large, heavy-bottom pot, heat oil using medium heat. Add onions and saute for a few minutes, then add garlic and cook for an additional minute (you wanna be careful with garlic -- overcook it and it gets bitter).
2. Add salt, chili powder, and cumin (and a little water if you sense it's going to set off that smoke alarm that's too close to the kitchen. Oh? That isn't normal? Ok. Though so.) 
3. Add honey, molasses and brown sugar. Mix everything well and bring to a boil. Let it keep going for about 3 minutes.
4. Add tomatoes, and cider (or sherry!) vinegar, bring to a boil, then lower it to a simmer on medium-low heat for 1.5-2 hours. It'll darken and thicken to something more recognizably BBQ-like. 
5. Once thickened, add white vinegar and Worcestershire sauce. Season with salt and pepper to taste (I also added paprika and cayenne to turn up the heat). 
6. Add the mix to a blender with 1/2 cup water. Blend and add water if you want to change the consistency.
7. Slather it all over some chicken and broil-n-bake it for some indoor BBQ. Save the rest in airtight containers, in the fridge for 2 weeks, in the freezer for longer.

Last night's dinner

Wednesday, May 26, 2010

'Tilde's Beans

Growing up, I was lucky enough to have my mother's delicious homecooking on a daily basis, so of course I've come to view her cuisine as the gold standard for Dominican cooking. As far as I'm concerned, it's gotta taste like Ma's or bust; simple as that. 

The thing is, perfecting one of her recipes can take a while...especially when your Ma doesn't write down recipes and always says she never had a passion for cooking. Through a combination of digging through childhood memories of sitting with my mom in the kitchen and just going with my gut, I've been able to recreate many of her dishes. The best part -- her utter surprise and delight when I tell her I've cooked up a storm. 

"You did what?!"
Yeah, Ma. I cook!

(Ma)Tilde's Beans

Ingredients
1/2 lb dry black or pinto beans
1 teaspoon chopped cilantro (or, to taste)
2 thin slices green bell pepper
1/2 a red onion, thinly sliced
1 Tablespoon garlic powder
1 Tablespoon tomato paste 
canola oil
a pinch of oregano
salt, to taste

Directions
1. In a large pot, place beans and enough water to cover them by about an inch. Set over medium-low heat and bring to a boil.
2. In a frying pan, heat a tablespoon of oil over medium heat. Add onion and pepper and saute for a few minutes until slightly tender. Add to beans.
3. Lower the heat and simmer until tender -- and here's the catch, this can take a few hours if you haven't presoaked them. Add water if necessary, and just keep boilin' til the beans are soft. Add garlic powder and tomato paste and oregano at any point, as well as the key ingredient: cilantro.
4. ONCE SOFT (and not a moment before!!!) add salt to taste. My mother always said adding salt prevents them from getting soft, so let's just trust mama on this one :)

Tuesday, May 25, 2010

Quick Sans Pic: Homemade Tomato Sauce

Some people give the thumbs up. Others nod to signal their approval. When food provokes a resounding "Yes," I shake my head. 

It's true! Whenever I discover a recipe to something that tastes BETTER homemade than store-bought (and is super easy to make!), I just get this feeling of  "Seriously?! Dang! Why haven't I made this before? This is amazing!" I guess the head shake reflects how almost disappointed I am that it took as long as it did to discover, but at the end of the day it's a sign of happiness.

Hopefully this 3-ish ingredient, basically 1-step recipe for homemade tomato sauce will have you shaking your head too :)
 
You can make your own tomato sauce!
Adapted from (you guessed it) Smitten Kitchen

Ingredients
28 oz can of whole, peeled tomatoes
5 Tablespoons unsalted butter
1 medium onion, peeled and halved
1 clove minced garlic
salt to taste 

Directions
1. In a medium pan over medium heat, toss together the tomatoes, butter and onion. {this is pretty much it, but I'll continue for the sake of closure.}
2. Bring to a simmer, then lower your heat and continue to simmer for about 45 minutes. Every now and then, stir and use your spoon to crush the tomatoes a bit. 
3. Remove from heat, remove the onion halves, and salt to taste (be sure to taste/ check if your canned tomatoes were already salted).
4. Serve with pasta, on a pizza, or save for later in a jar from one of those sub-par store-bought sauces ;) 

Sunday, May 23, 2010

Baguettes

daily bread

A few years ago Ania got me a copy of this pretty inspiring book called The French Don't Diet Plan by Dr. Will Clower. She had been working for a literary agency one summer and got copies of cool books every now and then, and she and I read this one together. It dismantles the "French paradox"-- i.e. the observation that the French have a low incidence of heart disease, despite ::GASP:: smoking, drinking, and eating high-fat foods-- and reveals it to be a lot more sensible than the media hype suggests. Essentially, as we should know by now, it's all about portion control (duh!), and by allowing ourselves full-fat options our bodies are satisfied sooner so we won't go back for seconds. This all makes perfect sense if you actually listen to your body. Unfortunately, a lot of Americans seem pretty incapable of eating just until they are full, so I wouldn't recommend this approach to everyone (and I'm sticking to my skim milk thankyouverymuch). 

But here comes the inspiring part: the selection of simple recipes in the back of the book. Never before had I even considered making my own bread, but after trying this recipe I realized there was a whole world of baking possibilities that were within my grasp! 

Ever since then, this baguette recipe has been my go-to whenever I want to make bread relatively quickly, since the author does a really nice job of specifying what you can do the night before in order to have fresh bread for dinner on a given weeknight. This recipe yields two loaves, which is also great if you want to freeze a loaf for another day (just wrap it in plastic, then foil, either after baking or even before... just be sure to defrost a few hours if you do plan on baking it post-freeze). I love this bread with salads, dipped in olive oil sprinkled with salt, or slathered in baba ganoush.

Baguettes
Yields 2 loaves
Adapted from The French Don't Diet Plan

Ingredients
1 teaspoon dry active yeast
1 1/4 cup warm water
3 cups all-purpose flour
1 1/2 teaspoons salt

Directions (see end of recipe for timing options)
1. In a small bowl combine the yeast with 1/4 cup of warm water. Stir to dissolve and let it sit a few minutes to activate.
2. In a separate, larger bowl, combine flour, salt, and the remaining water. Add yeasty water and mix with a wooden spoon until you form a ball. 
3. Turn out dough onto a lightly floured surface and knead for about 10 minutes, until smooth.
4. Place dough in a bowl that has been lightly oiled to prevent sticking, cover with plastic wrap and let rise for about an hour, or until doubled.
5. Press down risen dough, and form two long, thin baguette loaves. Place on a baking sheet and cover. Allow to sit and rise for another hour or two.
6. Preheat oven to 450 degrees F. Before setting the loaves in the oven, run a moistened hand over each. Bake for 30 minutes.
7. Once baked, allow to cool for a few minutes on a wire rack, then enjoy this crusty on the outside, fluffy on the inside, easy to make bread.

Timing Options:
a) All in one day: In the morning follow steps 1 & 2, then place the bowl in the fridge. This will allow the dough to rise while you're out at work or school. Once home, form loaves and let sit for an hour, then bake.
b) Planning ahead: The night before, follow steps 1 & 2, and allow dough to rise overnight. In the morning form the loaves, then place in the oven in the evening.

Thursday, May 20, 2010

Baked Potato Wedges


Finding a healthier way to make fast food is one of my favorite cooking missions in life. It just takes away some of the guilt without sacrificing the flavor, because we all know we crave this stuff at some point or another. These wedges are crispy on the outside (the thinner, the crispier) and fluffy on the inside, making these a great replacement-that-doesn't-feel-like-a-replacement for French fries. Less oil, no deep fryer needed (score!). And since they're baked, I feel much better about dipping them in mayo, which is a definite must in my book :)

Ingredients
as many potatoes as you like, any kind
olive oil
salt and pepper to taste
mayo (or ketchup, if you must)

Directions
1. Preheat oven to 450 degrees F.
2. Slice the potatoes lengthwise in half. Then cut each half (still lengthwise) into wedges by cutting at a bit of a slant.
3. Lightly coat both sides of your wedges with a little olive oil. Lay them on an aluminum foil-covered baking sheet, and sprinkle on some salt and pepper to taste.
4. Bake for about 30-45 minutes (flipping your wedges about midway through), until brown and crispy.
5. Forget the ketchup -- Dip 'em in mayonnaise and feel like a European.

Wednesday, May 19, 2010

Mackenzie's Tomato-Lentil Soup


Here is a Casa classic, courtesy of Mackenzie. This hearty soup is just what the doctor ordered on a cold, wintry day. Or a rainy/cloudy spring day when you're home with a hankering for some hearty soup.

Tomato Lentil Soup

4 Tbs. butter
2 cups chopped onions
2 cups chopped celery
2 35-ounce cans of Italian plum tomatoes, with juice
6 cups chicken stock
1/2 cup dried lentils (or as much as 1/2 lb)
1 cup chopped fresh Italian parsley
1/2 cup dry red wine
4 cloves garlic, finely minced
1/2 tsp. freshly ground black pepper
1/2 tsp. salt
1/4 tsp. ground cloves

1. Melt butter over low heat; add onions and celery and cook until wilted (about 10 minutes).

2. Purée tomatoes and juice; add to vegetables.

3. Add chicken stock and lentils; bring to a boil. Reduce heat and simmer uncovered for 20 minutes.

4. Add 1/2 cup of parsley, wine, garlic, pepper, salt, and cloves. Stir well, and simmer another 25 minutes. Add remaining 1/2 cup of parsley, simmer 5 minutes.

Note: Feel free to add whatever else tickles your fancy, like diced potatoes, some green leafy vegetable you want to get rid of like frozen kale... you know, anything :)

Monday, May 17, 2010

Because You're Worth It: Apple Tart


I just made an apple tart. Why? Because today I submitted my final two papers of the semester--30 pages total! 

This was another one of those too-easy-NOT-to recipes. I'd bought some frozen puff pastry a little bit ago in the hopes of making spanakopita--which I have yet to make--but it came in handy today as the key make-your-life-easier ingredient in this celebratory treat.

So what better way to celebrate the fact that (grad)school's out for summer?


Apple Tart
Adapted from The Pioneer Woman
Makes 1 tart

Ingredients
1 sheet frozen puff pastry
1 apple, cored but not peeled (my favorite are pink ladies)
1/4 cup of sugar (calls for brown, but only had white, which worked just fine)
1/4 teaspoon salt


Directions
1. Preheat oven to 415 degrees F.
2. Thaw your frozen pastry for about 30 minutes before peeling it open (it comes folded into thirds). Either cut it in half to make two tarts (extra puffy edges result), or into thirds to make three (less puffy). I cut mine in half and only used one of the halves.
3. Slice your apple as thinly as possible. Throw your slices in a bowl with the sugar and salt. Toss around to coat evenly and let sit for a bit so your apples get nice and juicy.
4. Lay your apple slices in a row on your tart, overlapping them slightly.
5. Bake for 18-20 minutes.
6. Ta da! You are so worth it.

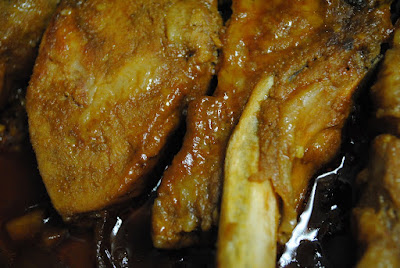
Finger Linkin' Good: Pork Ribs

 Fallin' off the bone, succulent, and oh-so satisfying.

Sometimes, when the full moon is out, some of us get in an almost unbearably carnivorous mood. Beans and hummus might have been enough of a protein fix a day or two ago, but not tonight. Oh, no. Tonight, you want meat.

Enter those pork ribs 'Chefski bought on a super-mega buy for way cheap. All you need is some meat (check!) and a few other ingredients you probably have lying around, and you can make delicious, melt-in-your-mouth, fall-off-the-bone, it's-not-delivery-it's-homemade ribs without a grill. I didn't even use BBQ sauce and these came out amazing. On the first shot!

So please, make yourself some ribs tonight. They're too easy and too tasty to pass on. 

Stovetop Ribs
Adapted from Allrecipes.com

Ingredients
1/4 cup water
1 Tablespoon Worcestershire sauce
1 Tablespoon soy sauce
1 Tablespoon minced garlic
4 pork ribs
1/2 red onion, thinly sliced
a splash of pomegranate molasses
a splash of Soy Vay Teriyaki sauce

Directions
1. Whisk together all of your ingredients (except for the ribs, of course!) in a small bowl.
2. Lay the pork in a medium saucepan and pour your sauce over them. Lay the thinly sliced onions atop, and cover the pan. Bring to a boil over medium heat, then simmer on low heat for 45 minutes. The meat will be so tender it will just about fall off the bone!
3. Serve it over polenta... and don't be afraid to scoop up some extra sauce from the pan to chow on. You won't believe you made this yourself. 

 ::Hungry Man Approved::

Tuesday, May 11, 2010

C'est Si Bon: Chocolate Babka


Butter. Butter and sugar. And eggs. And (wait for it) CHOCOLATE

Butter and sugar and eggs and chocolate.

That's what Jewish Babkas are made of, or at least the one I've been ogling for a few months over at Smitten Kitchen. The thing is, like I said, it's made of loads of butter and sugar and eggs... and the only way I could justify baking this bad boy was to wait for an occasion when I could give most of it away. So when the end of the semester rolled around and it was time to hand in my Theory seminar paper, I knew the day had finally come. I made it for our last day's potluck, and let me tell you -- it was a hit.

A real hit, a la those old Yoplait commercials"I-can't-believe-you-didn't-buy-this!" good, people-talking-about-it-the-next-day good, "what-is-this-MADE-of?!?!"* good. 

Lots of sugar, a little spice. I think it all turned out quite nice.

*The "?!" punctuation mark has a name: the interrobang. This non-Standard punctuation mark is often used to express disbelief or excitement. Both were present at my theory seminar. Many thanks to Ania for first bringing to my attention the existence of the interrobang.  

Chocolate Babka 
Adapted from Smitten Kitchen

Makes 3 loaves. I baked two and froze one (which you can do after step 10).

Ingredients
1.5 cups warm milk
2 packages dry active yeast (1/4 oz each)
1.75 cups sugar
3 whole large eggs, at room temperature
2 large egg yolks, at room temperature
6 cups all-purpose flour
1 teaspoon salt
1.75 cups (i.e. 3.5 sticks) unsalted butter, cut into 1-inch cubes, and at room temperature
2 bags of semi-sweet chocolate chips (you want around 2.25 lbs, but I had slightly less. We also threw them into the blender and pulsed them a bit to make the pieces smaller)
2.5 Tablespoons  ground cinnamon
1 Tablespoon heavy cream (you can make amazing biscuits with the leftover cream)
we also added some dried fruit -- raisins -- though craisins would have been great too. whatever you like.
Streusal topping (I couldn't bring myself to use even MORE butter, but I'll include the recipe to this below)

Directions 
1. In a small bowl: pour in warm milk with a pinch of sugar, then sprinkle the yeast on top.  Let it sit for about 5 minutes -- it'll get crazy foamy.
2. In a medium bowl, whisk together 3/4 cup of sugar, 2 eggs, and your egg yolks. Combine your egg and yeast mixtures and whisk them to combine.
3. Because I don't have an electric mixer fitted with a paddle attachment (one day... one day) I simply used a wooden spoon to combine the flour and the salt. I then added the egg mixture and mixed to combine. Add the butter and keep on mixing til everything is incorporated (and by all means, if you do have a mixer, use it! I have a hand mixer but didn't feel like pulling it out).
4. Turn out your dough onto a lightly floured surface and knead until smooth. You don't want your dough to be excessively sticky, but sticky nonetheless. Place in a large bowl and cover with plastic wrap. Leave aside in a warm place until doubled, about an hour. (Now, the original recipe says to butter the bowl before you put the dough in, but seriously, there is no need. I didn't, and it didn't stick).
5. Combine chocolate, the rest of the sugar, your cinnamon, and dried fruit if you're using it in a large bowl. Cut in 1 1/2 sticks of butter using two knives, until everything is well combined. Set aside for later.
6. The original recipe instructs you to generously BUTTER three 9X5X2 3/4 inch loaf pans... but I lightly buttered them (so much butter!). Beat your last egg with the tablespoon of cream, and set this aside for later (it's your egg wash).
7. Now that your dough has risen, punch it down and transfer to a clean surface. After letting it rest for 5 minutes, cut into 3 equally-sized pieces. Keep the 2 pieces you're not working with covered in plastic.
8. Using a rolling pin, roll out 1 piece of dough on a generously floured surface. You want to end up with a square that is about 1/8 inch thick and 16 by 16 inches. Don't worry if it's not perfect.
9. Brush the edges of your square with the egg wash. Sprinkle 1/3 of the chocolate filling evenly over the dough, and leave a 1/4 inch border to facilitate rolling. Now roll it like a cinnamon roll, nice and tight, pinching the ends to seat it.
10. Now's the semi-tricky part. Take the roll and twist it 5-6 times. Brush the top of the roll with the egg wash. Now crumble 2 tablespoons of the filling over the left half. Fold the right section over the left section so that you sandwich the filling in the between the two. Finally, fold the ends under, punch to seal, and twist twice more. Place in your pan and repeat these steps with the remaining two pieces of dough and your filling. At this point, you may choose to continue and bake, or freeze by covering in plastic wrap and placing inside a plastic bag (sand pan, of course!)
11. Preheat your oven to 350 degrees F. Now brush the top of each loaf that you are baking with the egg wash. I chose to sprinkle some cinnamon & sugar on top, but I'll go ahead and give you the recipe for the buttery streusel topping I just couldn't bring myself to make:
12. Cover your loaves loosely with plastic wrap and let sit in a warm place for 20-30 minutes.
13. Bake loaves for about 55 minutes (until golden). Be sure to rotate the pan 180 degrees midway through to ensure even baking. Once 55 minutes are up, lower the temperature to 326 degrees F and bake for 15-20 minutes more.
14. Remove your pans from the oven and place on a wire rack to cool. Once completely cool, remove from pans and just give yourself over to the buttery, gooey, chocolately goodness. Because you're worth it.

For those who dare add even more butter, to make the streusel:

Makes 3 3/4 cups
Ingredients
1 2/3 cups confectioners' sugar
1 1/3 cups all-purpose flour
12 Tablespoons (1 1/2 sticks) unsalted butter, at room temperature

Directions
In a large bowl combine all the above ingredients, and using a form, stir until everything is combined and you have formed delectable crumbs.

99 ¢ Blueberries @The Social Safeway = The Best Darn Blueberry Muffins to Date

This one's a 'Chefski original

In keeping with my interest in movies, I recently finished writing a paper on Kathryn Bigelow's The Hurt Locker, where I focused on her film's emphasis on the dangers of "physical and psychic" blindness. In one of my favorite scenes, the protagonist returns home only to be faced with his inability to readjust to civilian life. His discomfort is revealed masterfully when his wife casually asks him to "grab some cereal," and all he can do is uncomfortably scan the aisle, which is filled to capacity, before his irritation draws him to whatever box is within reach. Consumerism at its worst: too much choice where it doesn't matter. 

So there, I proved to you that I am a critical thinker and that I despise excess, which will hopefully make what I'm about to say next go down a little easier.

You have got to see the new Safeway that opened up last week. They've got organic and conventional produce, a fancy climate-controlled wine cellar, a Starbucks, a pizza station, gelato and ice cream station, and they make sandwiches just like at the Wawa. Not only is it as beautiful as the nicest Whole Foods you've ever been to (and has the normal brands WF thinks itself too good to carry); it is the first supermarket in the entire District built to LEED standards (i.e. entirely sustainable). I dig that. I really do.

Of course, I speak from the perspective of someone who, back in NYC, lived in a 'hood where edible produce within a walkable distance was scarce, and frozen blueberries were near-impossible to find. Given that, just imagine my delight on opening night when I discovered that fresh blueberries were going for 99 ¢! Yes, it's a big deal! They're usually closer to four bucks a pop (and by "pop" I mean pack). If that had or has been in your past, I think you'll dig this place too.

Or if you like shiny, new things. Or if you can admire and respect a business that clearly still believes that "the customer is always right." And again, coming from a place where few people seemed particularly happy to have jobs -- even as grocery baggers -- it is refreshing to enter a store where everyone knows the rules of the game: you make your customers happy, they will buy more.

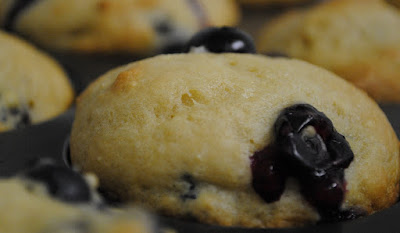
As my high school Economics teacher used to say: Build it and they will come*. They built it. I went. I got some blueberries. And I think I finally found the muffin recipe I have been searching for.  

* I wish I could remember who he was quoting.


By George! I think we've got it! Blueberry Muffins
Adapted from The Joy of Baking 

Ingredients
2 cups all purpose flour
1/2 cup sugar
1 teaspoon baking soda
1/4 teaspoon salt
1 cup plain yogurt
1 large egg, lightly beaten
4 oz apple sauce (an individual container... I used this instead of the 1/4 cup canola oil the recipe calls for)
1/2 teaspoon vanilla extract
1 1/4 cup blueberries (fresh or frozen -- don't thaw)

 The blood blueberry is the life!

Directions
1. Preheat oven to 350 degrees F. Place rack in center of oven, and lightly grease your muffin tin.
2. In a medium-sized bowl whisk together the egg, yogurt, apple sauce (or oil) and vanilla extract. 
3. In a large bowl whisk together flour, sugar, baking soda, and salt. 
4. Scoop 1 Tablespoon of your dry ingredients and toss it around with your blueberries.
5. Using a rubber spatula, fold your wet ingredients into your dry ingredients and stir until just combined. 
6. Gently fold in the blueberries -- don't overmix or the berries will sink to the bottom (and your batter won't rise... you want to keep your baking soda's rising power for the oven). 
7. Fill your muffin pan with the batter, lick the leftover batter from the bowl, and bake your muffins for 15-20 minutes or until a toothpick/knife/ other "done-ness tester" inserted into the center of a muffin comes out clean. 
8. Transfer the pan to a wire rack or plate and let cool for about 5 minutes before you remove the muffins from the pan.
9. Got milk? Dive in!

Friday, May 7, 2010

Light Wheat Bread


I like to hunt for things to bake. I set my sights on a particular project, like, say, blueberry muffins, or, in this case, whole wheat bread, and I search and bake and repeat until I find THE version to die for. These mini-obsessions help me stay sane, especially when I'm faced with a blank "sheet of paper" on Word and a big paper deadline looming. I get to set something in motion while I work away on my intellectual shtuff, and when two hours pass and the dough has risen, I am rewarded with a much-needed kneading break. Because come on-- who doesn't love the stress-relieving physicality of kneading and twisting and squeezing some dough... and then eating it?

I want to find a bread to replace every pre-sliced, plastic-bagged grocery brand I've ever had. I'm not quite there yet, but this one's the best one I've made to date. Great fresh, toasted, with hummus or preserves, and as french toast days later :)


Light Wheat Bread
Adapted from Smitten Kitchen

Ingredients
2.5 cups bread flour
1.5 cups whole wheat flour
1.5 Tablespoons honey
1.5 teaspoons salt
3 Tablespoons powdered milk (we had some leftover from Snowmaggedon)
1.5 teaspoons active dry yeast
2 Tablespoons unsalted butter, at room temperature
1.25 cups of room temperature water

Directions
1. In a mug, mix together yeast and 1/4 cup of warm-ish water. Stir to dissolve, and set aside to activate while you combine the dry ingredients.
2. In a large bowl mix combine bread flour, whole wheat flour, salt, and powdered milk.
3. Add yeast mix, butter, honey, and the last cup of water to the bowl of dry ingredients.
4. Stir together until the dough comes together and forms a ball. Add a little water if necessary.
5. Turn out dough onto a lightly floured surface, kneading for about 10 minutes until smooth. You want a firm but supple dough, so add flour or water accordingly.
6. Place dough in a lightly oiled bowl, and cover with plastic wrap. Allow to ferment at room temperature until double in size, about 1.5-2 hours.
7. After your dough has risen, turn it out onto a lightly-floured surface and press (with your hands!) into a rectangle 3/4 inches thick and about 6 by 8 inches. 
8. Form the loaf by rolling starting from the short side of the rectangle. Be sure to pinch the bread down each time you roll it to add surface tension (and keep you bread from breaking apart while baking). Once you're done rolling, pinch the ends together and place in a lightly oiled bread pan (8 1/2 by 4 1/2 inches).
9. Lightly spray the top with cooking oil and cover with plastic wrap. Leave at room temperature for 60 to 90 minutes until the bread rises above the brim of the pan.
10. Preheat oven to 350 degrees.
11. Place bread pan on a baking sheet and bake for 30 minutes. Rotate the pan 180 degrees and bake for an additional 15-30 minutes until golden.
12. Once done baking, immediately remove from the pan and place on a rack to cool. You can also check it's done-ness by tapping it on the bottom -- it will sound hollow. 
13. Allow to cool for 1-2 hours before slicing. 
14. You just made some bread!


'Chefski's a master bread-slicer

::Caro-Carbs::